Knowing how to use a car jack is a key skill for anyone who owns or drives a vehicle. Many people keep their car’s jack tucked away until an emergency happens. Learning the right steps in advance can save time and lower the risk of injury or damage. With the right knowledge and a little practice, anyone can lift their car confidently and safely when needed.
Types of Car Jacks
Car jacks come in several designs, each with strengths and weaknesses. Choosing the right jack and knowing how to use it helps keep a vehicle secure during repairs.
Scissor Jacks: Operation and Uses
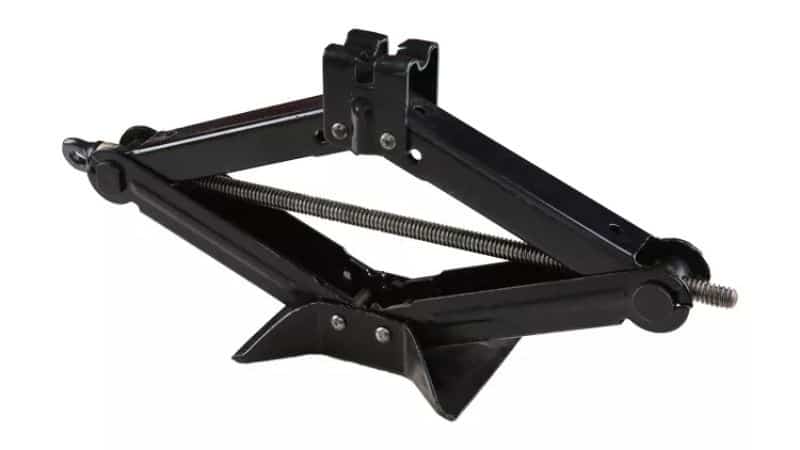
A scissor jack is a mechanical car jack often included with most passenger vehicles. It works by turning a screw, which pulls its arms together and raises the center. Its simple design and small size make it easy to store in a trunk.
Scissor jacks are best for emergency tire changes or light-duty work since they are lightweight and compact. The user turns a crank or a wrench to slowly lift or lower the vehicle. Always position a scissor jack only at the reinforced jack points recommended by the car’s manufacturer. If it’s used wrong or placed on soft or uneven ground, it can slip and cause accidents.
Most scissor jacks can lift between 1 to 1.5 tons, which is enough for small cars but not heavier vehicles. They are not well-suited for frequent use or jobs that require the car to stay lifted for long periods.
Hydraulic Jacks: Floor and Bottle Jacks Explained
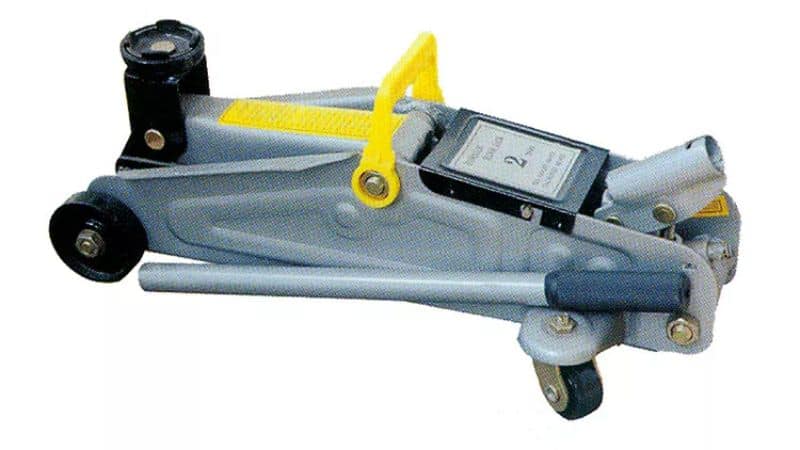
Hydraulic jacks use fluid pressure to lift cars with less effort. There are two common types: floor jacks and bottle jacks.
A floor jack is stable, rolls on wheels, and features a long handle for pumping. It delivers a quick lift and works well for garages or flat, hard surfaces. It is bigger and heavier than a scissor jack but provides more control and can lift heavier vehicles easily.
Bottle jacks, shaped like small cylinders, are upright and compact. They use the same hydraulic system as floor jacks but need less storage space. Bottle jacks can lift very heavy loads but need higher clearance under the car to fit into place.
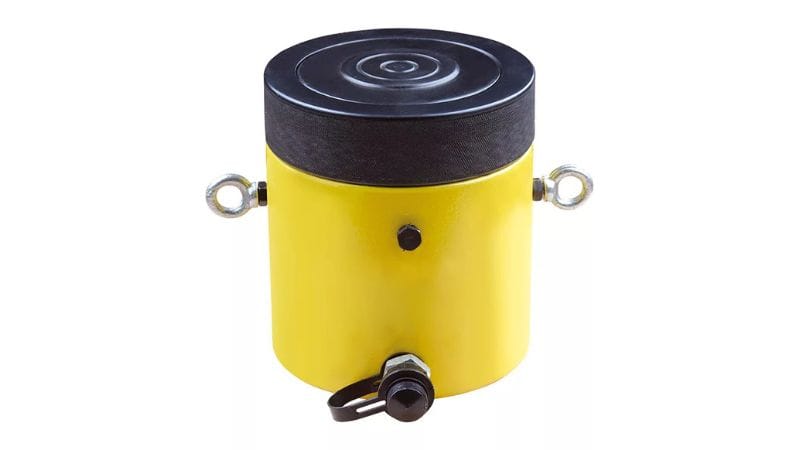
Both types should only be used on solid ground, and jack stands should support the vehicle once it is off the ground.
Vehicle Preparation and Safety Precautions
Taking the right safety steps before using a car jack lowers the risk of injury and protects the vehicle from damage. Most problems can be avoided by checking the area around the vehicle, securing it on all sides, and making sure the ground is stable.
Parking Brake and Transmission Setting
The first action is to set the parking brake firmly. This helps hold the car in place and stops any unwanted movement while lifting. For automatic transmissions, it’s important to shift the gear selector to “Park.” For manual transmissions, the gear shift should be in first gear or reverse.
Make sure the keys are removed from the ignition to avoid accidental rolling. Double-check that the brake is fully engaged—press the lever or pedal as far as it can go. Cars on a slope or incline need extra attention, as gravity increases the risk of slipping.
Failing to secure the transmission can result in the car rolling off the jack. Never skip this step. The parking brake and proper transmission setting work together as the first line of defense before raising the car.
Using Wheel Chocks to Prevent Rolling
Wheel chocks are wedges made from rubber, plastic, or metal. They are placed firmly against the tires that will remain on the ground. This blocks them from moving and keeps the car steady during lifting.
For a front tire change, place the chocks behind the rear tires. For a rear tire, put them in front of the front wheels. For extra security on slopes, use chocks on both sides of the wheel touching the ground.
Chocks should be placed flat and squarely so the vehicle can’t roll forward or backward. It is best to use at least two chocks, one on each side. If commercial chocks are not available, a strong piece of wood can be used instead in an emergency. Always chock the wheels even if the ground seems level.
Inspecting Surface Stability Before Lifting
Check the ground under the car before jacking it up. The surface should be solid and flat—concrete or asphalt is best. Loose gravel, grass, dirt, or soft pavement can make a jack or vehicle support unstable and lead to accidents.
Look for uneven spots or dips that might let the jack tilt or slide. Never use a jack on a slope, hill, or soft ground unless there is no other choice and extra precautions can be taken.
If only soft ground is available, a wide wooden plank under the jack can increase stability, but it won’t make it as safe as pavement. Keep the area around the car clear of objects, wet patches, and oil. Good surface stability lowers the chance of the car shifting or falling while it is raised.
Locating and Using Car Jacks
To avoid mistakes and injuries, it is important to know where to place the jack, how to use it, and what safety steps to follow each time.
Identifying Safe Jacking Points
Every car has specific places called jacking points where a jack can be placed safely. These locations are reinforced parts of the car’s frame, designed to support its weight when lifted. Using the wrong spot can damage the car or cause the jack to slip.
Most vehicles have four main jacking points. These are usually found just behind the front wheels and ahead of the back wheels, often along the metal ribs or seams under the doors. Drivers can find exact locations in the owner’s manual or on diagrams sometimes printed on the frame itself.
How to Jack Up a Car Safely

Once the correct jacking point is located, it is important to set the jack up so it sits flat and stable. Many car jacks have a notch or slot that fits over the reinforced rib at the jacking point. It should be aligned so the slot fully supports the car’s rib. Floor jacks and bottle jacks might use a round or flat pad, which must be centered under the jacking point.
Safety steps should be followed closely to lower risk. If there are passengers, ask them to get out before lifting the car. Remove the spare tire and any tools first so you are ready once the car is off the ground. Make sure nothing is under the car except for the jack and, later, a jack stand.
Stay at the side of the car as you pump or turn the jack handle, never directly in front. Keep hands and feet away from the jack’s moving parts at all times.
Lifting and Lowering the Vehicle Step-by-Step
Turn or pump the jack handle slowly, checking that the jack is rising straight up. Watch for any signs that the jack is tilting or the car is shifting. If anything seems off, lower the vehicle and start over.
Lift the car just high enough so the tire is clear off the ground. If you plan to work under the car, place a jack stand under a nearby reinforced spot right away and lower the car onto the stand gently. Never work under a car supported only by a jack.
When finished, first remove any jack stands if used, raising the car a little if needed. Slowly lower the jack by reversing the handle—most car jacks turn counterclockwise to go down. Make sure the wheel or car body is fully back on the ground.
Never rush through lowering the car. Always make sure everyone is clear of the vehicle and that the jack comes down smoothly without slipping.
Frequently Asked Questions
What is the correct way to position a jack under a vehicle?
The jack must be placed at a designated jack point on the car. These points are usually under the frame, behind the front wheels, or in front of the rear wheels. Many cars have notches, reinforced spots, or marks indicated in the owner’s manual.
Always check that the jack is flat on the ground and lined up with the correct spot. If the jack slips or is in the wrong location, it can damage the car or cause it to fall.
How can you safely use a jack stand after raising the car?
Once the car is high enough, place jack stands under the same reinforced lift points used for the jack. Lower the car slowly onto the stands, making sure the weight rests fully on them.
Do not work under a vehicle supported only by a jack. Always check that stands are locked and stable before removing the jack or starting any work.
Can you guide me through the process of jacking up a car to change the oil?
First, park the car on level ground and turn off the engine. Set the parking brake and place wheel chocks behind the tires that will stay on the ground.
Find the correct jack point at the front of the car, place the jack under it, and lift until there is enough room to work underneath. Next, position jack stands under the car at safe lift points and lower the car onto the stands.
Make sure the car is stable before getting under it to change the oil. Only start draining oil or removing the filter once the stands are fully supporting the vehicle and the jack is no longer holding weight.